Tuesday, September 12, 2017

RabbitMQ on Kubernetes Container Cluster in Azure

Introduction

This post is quite technical (and long, and detailed), so sit down, enjoy your coffee, and let’s get started!


Containers are becoming the way forward in the DevOps and IT worlds, as they greatly simplify deployments of applications and IT infrastructure.
RabbitMQ is “the most widely deployed open source message broker”, and easy to use within a Docker Container Image.
Kubernetes is considered the De-facto Standard for Container Orchestration.

To follow this tutorial you can use the built in Azure Cloud Shell, or download and install the Azure CLI, and use PowerShell locally. Make sure you have installed Azure PowerShell.
You will also need Kubectl, so make sure you install that too (I suggest Choco as the easiest way).
Here I am using PowerShell.


Resource Group

First you have to login to Azure through PowerShell:
az login

You will receive a message such as:
To sign in, use a web browser to open the page https://aka.ms/devicelogin and enter the code CF5G5AJQZ to authenticate.

Follow the above instructions, and PowerShell will be logged onto Azure, returning the available Azure Subscriptions details.
Copy the ID of the Subscription you want to use, and use it in the next command:
az account set --subscription "[My-Azure-Subscription-ID]"

Now you can create the Resource Group used for the Kubernetes Cluster:
az group create --name "[My-ResourceGroup]" --location "westeurope"


Service Principal

Now create a Service Principal to be used for the Kubernetes Cluster:
az ad sp create-for-rbac --role="Contributor" --scopes="/subscriptions/"[My-Azure-Subscription-ID]/resourceGroups/[My-ResourceGroup]"

Copy the appId, password and tenantId values returned, and test the login for your newly created Service Principal:
az login --service-principal -u "[My-App-ID]" -p "[My-Password]" --tenant "[My-Tenant-ID]"

You should receive the details of the current Subscription, with user type “servicePrincipal”, so now you can test its permissions by executing the following command:
az vm list-sizes --location westus
If this command returns a long list of VM Sizes, you’re good to go. If not, talk to your Azure Subscription Owner.


Now login again as your main user as you did before, and again set your Subscription:
az login
az account set --subscription "[My-Azure-Subscription-ID]"
You need to create a SSH key, follow this tutorial:


Kubernetes Cluster

You can create a Kubernetes Cluster locally using MiniKube.

On the Azure Portal you can create the Kubernetes Cluster either manually, or using this helpful ARM template:
First download the ARM Parameters file from:
Make sure you fill this file with your details, something like:
{
  "$schema": "http://schema.management.azure.com/schemas/2015-01-01/deploymentParameters.json#",
  "contentVersion": "1.0.0.0",
  "parameters": {
    "dnsNamePrefix": {
      "value": "[My-Unique-Kubernetes-Cluster-DNS]"
    },
                "agentCount": {
                  "value": 1
                },
                "masterCount": {
                  "value": 1
                },
    "adminUsername": {
      "value": "[My-ServicePrincipal-Username]"
    },
    "sshRSAPublicKey": {
      "value": "[ssh-rsa My-RSA-PublicKey]"
    },
    "servicePrincipalClientId": {
      "value": "[My-ServicePrincipal-ID]"
    },
    "servicePrincipalClientSecret": {
      "value": "[My-ServicePrincipal-Password]"
    },
    "orchestratorType":{
      "value": "Kubernetes"
    }
  }
}
Now you can run the following command to create the Kubernetes Cluster:
az group deployment create -g "[My-ResourceGroup]" --template-uri "https://raw.githubusercontent.com/Azure/azure-quickstart-templates/master/101-acs-kubernetes/azuredeploy.json" --parameters "[My-Local-Path]\azuredeploy.parameters.json"

After about 15 minutes you should get a response, which hopefully will display ”Finished” and “Succeeded”, along with all the configuration of your newly created Kubernetes Cluster.

So if you now open the Azure Portal, and browse to your Resource Group, you should see something like this:


This is your newly created Kubernetes Cluster on Azure!
However, you are not done just yet.

You still need to install RabbitMQ on your Cluster, as well as create another Azure Load Balancer and two more Public IPs to expose RabbitMQ publicly.


RabbitMQ

First let’s make sure that you are connected to the right Cluster (in case you have created more than one, this command is essential).
az acs kubernetes get-credentials --resource-group="[My-ResourceGroup]" --name="[My-ContainerServiceName]"

So if you now run the following command to get info about your Cluster:
kubectl cluster-info

You should see the following output:
Kubernetes master is running at https://[My-Unique-Kubernetes-Cluster-DNS].westeurope.cloudapp.azure.com
Heapster is running at https://[My-Unique-Kubernetes-Cluster-DNS].westeurope.cloudapp.azure.com/api/v1/namespaces/kube-system/services/heapster/proxy
KubeDNS is running at https://[My-Unique-Kubernetes-Cluster-DNS].westeurope.cloudapp.azure.com/api/v1/namespaces/kube-system/services/kube-dns/proxy
kubernetes-dashboard is running at https://[My-Unique-Kubernetes-Cluster-DNS].westeurope.cloudapp.azure.com/api/v1/namespaces/kube-system/services/kubernetes-dashboard/proxy
tiller-deploy is running at https://[My-Unique-Kubernetes-Cluster-DNS].westeurope.cloudapp.azure.com/api/v1/namespaces/kube-system/services/tiller-deploy/proxy

Based on this tutorial, now create a YAML configuration file (call it: rabbitmq.yaml), for your RabbitMQ.
You can use the following:

apiVersion: v1
kind: Service
metadata:
  # Expose the management HTTP port on each node
  name: rabbitmq-management
  labels:
    app: rabbitmq
spec:
  ports:
  - port: 15672
    name: http
  selector:
    app: rabbitmq
  sessionAffinity: ClientIP
  type: LoadBalancer
---
apiVersion: v1
kind: Service
metadata:
  # The required headless service for StatefulSets
  name: rabbitmq
  labels:
    app: rabbitmq
spec:
  ports:
  - port: 5672
    name: amqp
  - port: 4369
    name: epmd
  - port: 25672
    name: rabbitmq-dist
  clusterIP: None
  selector:
    app: rabbitmq
---
apiVersion: v1
kind: Service
metadata:
  # The required headless service for StatefulSets
  name: rabbitmq-cluster
  labels:
    app: rabbitmq
spec:
  ports:
  - port: 5672
    name: amqp
  - port: 4369
    name: epmd
  - port: 25672
    name: rabbitmq-dist
  type: LoadBalancer
  selector:
    app: rabbitmq
---
apiVersion: apps/v1beta1
kind: StatefulSet
metadata:
  name: rabbitmq
spec:
  serviceName: "rabbitmq"
  replicas: 4
  template:
    metadata:
      labels:
        app: rabbitmq
    spec:
      terminationGracePeriodSeconds: 10
      containers:
      - name: rabbitmq
        image: rabbitmq:3.6.6-management-alpine
        lifecycle:
          postStart:
            exec:
              command:
              - /bin/sh
              - -c
              - >
                if [ -z "$(grep rabbitmq /etc/resolv.conf)" ]; then
                  sed "s/^search \([^ ]\+\)/search rabbitmq.\1 \1/" /etc/resolv.conf > /etc/resolv.conf.new;
                  cat /etc/resolv.conf.new > /etc/resolv.conf;
                  rm /etc/resolv.conf.new;
                fi;
                until rabbitmqctl node_health_check; do sleep 1; done;
                if [[ "$HOSTNAME" != "rabbitmq-0" && -z "$(rabbitmqctl cluster_status | grep rabbitmq-0)" ]]; then
                  rabbitmqctl stop_app;
                  rabbitmqctl join_cluster rabbit@rabbitmq-0;
                  rabbitmqctl start_app;
                fi;
                rabbitmqctl set_policy ha-all "." '{"ha-mode":"exactly","ha-params":3,"ha-sync-mode":"automatic"}'
        env:
        - name: RABBITMQ_ERLANG_COOKIE
          valueFrom:
            secretKeyRef:
              name: rabbitmq-config
              key: erlang-cookie
        ports:
        - containerPort: 5672
          name: amqp
        - containerPort: 25672
          name: rabbitmq-dist
        volumeMounts:
        - name: rabbitmq
          mountPath: /var/lib/rabbitmq
  volumeClaimTemplates:
  - metadata:
      name: rabbitmq
      annotations:
        volume.alpha.kubernetes.io/storage-class: default
    spec:
      accessModes: [ "ReadWriteOnce" ]
      resources:
        requests:
          storage: 1Gi # make this bigger in production


So now that you have created the rabbitmq.yaml locally, let’s create a generic secret for the Erlang Cookie by running the command (use a better secret though..):
kubectl create secret generic rabbitmq-config --from-literal=erlang-cookie=c-is-for-cookie-thats-good-enough-for-me

And finally create the RabbitMQ Kubernetes Services and Pods:
kubectl create -f "[My-Local-Path]\rabbitmq.yaml"

Verify all Parts

Run the Kubernetes Dashboard locally, by running the following command (port is optional, the default uses 8001):
kubectl proxy --port=8080

And if you open your browser to the URL http://127.0.0.1:8080/ui you should see the Kubernetes Dashboard, like this:

Here you will see all details about the Kubernetes Cluster, Pods, Services, etc.
And if you click on the rabbitmq-management IP Hyperlink displayed (use guest as both username and password), you will access the RabbitMQ Management dashboard, showing four nodes:
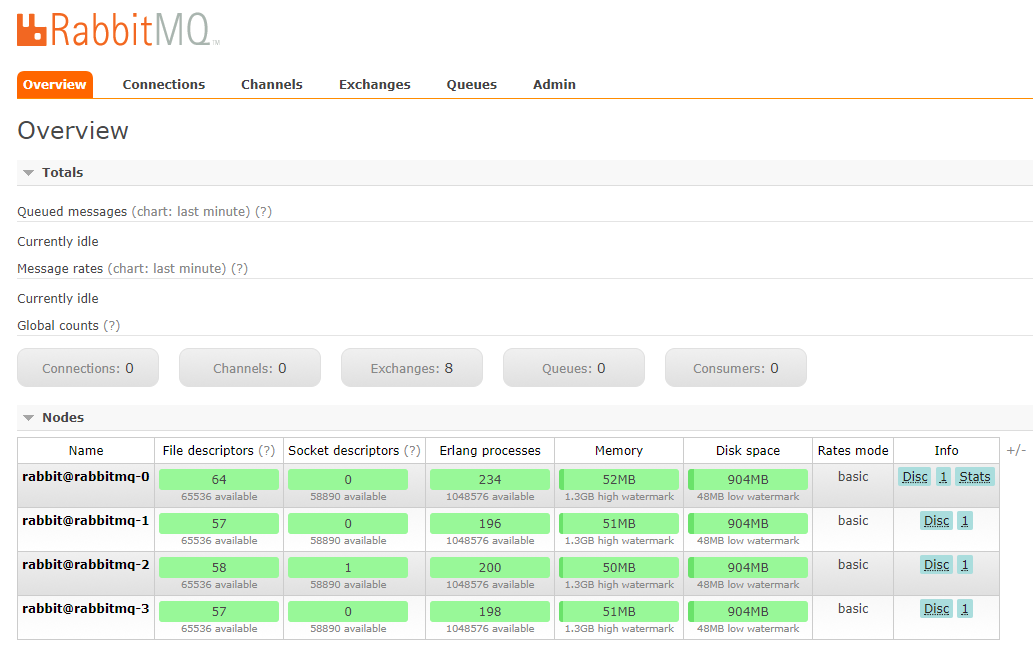

You can see in the Pods section of the Kubernetes Dashboard the corresponding four Pods:


And to complete the picture, if you look at your Azure Resource Group again: 


You will notice three new resources added: a Load Balancer for RabbitMQ, and two new Public IP addresses, to expose RabbitMQ and its Management Dashboard.

This is it for this long post, enjoy your Containers!

Monday, September 4, 2017

Azure App Service Deployment Slots


Just a quick one today: Deployment Slots are one way to manage your Azure App Service deployments, giving you the option to do a "hot swap" of a live production application with little to no downtime.

At the same time they allow you to easily manage your app versioning, by making sure that you always have a "Last Known Good" version of your app, a few clicks away from being rolled back on production when something goes wrong in your release.

You can set up VSTS to configure your Staging Slot before deploying to it, as mentioned in a previous post of mine.

Here is a quick overview of the common Deployment Slots usage:


Monday, August 21, 2017

Devil is in the (RedirectUri) detail

When using Azure Active Directory (AAD) as Identity Provider for your Azure App Services, you will set up App Registrations to tell AAD how to handle your app authentication.

One important bit of this is the ReplyURL (RedirectUri) that you need to specify for AAD to redirect the user back to your app after valid authentication.

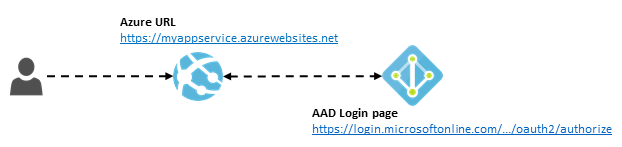
The usual flow is:
  1. User requests your app URL (ie: https://myappservice.azurewebsites.net)
  2. User is redirected to the AAD Login page (https://login.microsoftonline.com/.../oauth2/authorize)
  3. User inserts valid credentials
  4. User is redirected back to your defined RedirectUri as a logged on User (https://myappservice.azurewebsites.net)


For this to happen, you will need to specify in your application as AppSettings in the web.config file:
 <add key="ida:PostLogoutRedirectUri“ value="https://myappservice.azurewebsites.net" />
<add key="ida:RedirectUri“ value="https://myappservice.azurewebsites.net" />

And in the Startup.Auth.cs file (here I am using a .NET MVC Web App and OpenID Connect Authentication):
app.UseOpenIdConnectAuthentication(

new OpenIdConnectAuthenticationOptions

{

RedirectUri = ConfigurationManager.AppSettings["ida:RedirectUri"],

PostLogoutRedirectUri = ConfigurationManager.AppSettings["ida:PostLogoutRedirectUri"],
Now, let’s assume that as a security requirement in your organization, your App Service must reside behind an F5 LoadBalancer, and all traffic must go through it, and that also Mutual Client Authentication must be in place between the F5 and your App Service.

For this scenario to occur, you need to set up a few parts in the Azure App Service and AAD (the F5 setup and DNS entries are out of scope for this post):

  •      Enable Client Certificates in the Resource Explorer of the App Service: "clientCertEnabled": true (this will make sure that the App Service expects a SSL Certificate for each request).
  •      Define a Custom Domain on the App Service as specified in the SSL Client Certificate, ie: https://myappdomain.corporateurl.com
  •    Upload the valid SSL Client Certificate to the App Service, and create a SSL binding to the Custom Domain
  •      Define a Custom Domain on the App Service as the F5 public endpoint for this web app, ie: https://myappsf5domain.corporateurl.com
  •       Add the new App Service Custom Domains URLs to the AAD App Registration as ReplyURLs: https://myappdomain.corporateurl.com and https://myappsf5domain.corporateurl.com
  •         Implement custom Certificate Validation code inheriting from System.Web.Mvc.IAuthorizeFilter and FilterAttribute (ie: public class ClientCertificateValidatorFilter : FilterAttribute, IAuthorizationFilter)
  •         Add the corresponding [CustomAuthorizeAttribute] to the desired Controller classes (or Actions) (ie: [ClientCertificateValidatorFilter])
  •         Since the security requirement is that all traffic must go through the F5, specify the F5 URL as RedirectUri and PostLogoutRedirectUri in the web.config file:

<add key="ida:PostLogoutRedirectUri“ value="https://myappsf5domain.corporateurl.com" />
<add key="ida:RedirectUri“ value="https://myappsf5domain.corporateurl.com" />

So now the “Happy Path” flow is:
  1. User requests your app URL to the F5 (https://myappsf5domain.corporateurl.com) 
  2. Since the F5 provides the SSL Certificate in the HTTP Header, no popup shows in the browser
  3. User is redirected to the AAD Login page (https://login.microsoftonline.com/.../oauth2/authorize)
  4. User inserts valid credentials
  5. User is redirected back to your app as a logged on User, going again through the F5 (https://myappsf5domain.corporateurl.com)
  6. The Certificate validation code kicks in and validates the right SSL Certificate provided by the F5 (keep in mind that the Authorize filters will execute only AFTER authentication, hence User login)


So far so good, right?

Now, let’s test some less happy flow.

We know that all traffic must go through the F5, so let’s try to call the Azure URL (https://myappservice.azurewebsites.net) directly.
  1. User requests the Azure URL (https://myappservice.azurewebsites.net)
  2. User is prompted for a SSL Certificate
  3. User cannot provide a SSL Certificate, so hits Cancel on the certificate popup
  4. User receives a 403 – Forbidden response (correctly)

Again, so far so good.

But what happens if the User provides the wrong SSL Certificate, instead of canceling the popup?
  1. User requests the Azure URL (https://myappservice.azurewebsites.net)
  2. User is prompted for a SSL Certificate
  3. User provides any (wrong) SSL Certificate
  4. User is redirected to the AAD Login page (https://login.microsoftonline.com/.../oauth2/authorize)
  5. User inserts valid credentials
  6. User is redirected back to your app as a logged on User (incorrectly)
  7. The Certificate validation code kicks in and validates the right SSL Certificate provided by the F5

A few things will go wrong in this scenario: 
  • Since the defined RedirectUri is the F5 URL, now the User is redirected to this endpoint (https://myappsf5domain.corporateurl.com), however the request was coming from the Azure URL (https://myappservice.azurewebsites.net), so it will result in a AuthenticationFailed error, and the User will land on the Error page of your app, showing the message: “IDX10311: RequireNonce is 'true' (default) but validationContext.Nonce is null. A nonce cannot be validated. If you don't need to check the nonce, set OpenIdConnectProtocolValidator.RequireNonce to 'false'.” 
  • Even though the User provided a wrong SSL Certificate, since now he’s going through the F5 after authenticating, the right SSL Certificate is provided and the validation succeed.
Let leave aside the fact that Client Certificates can only be validated AFTER User authentication (login), which IMHO is a big security design flaw.. but anyways.

So, after several hours spent on the phone with Microsoft Support (thankfully to the Premier level of support, this was possible in the first place), the solution to this scenario has been identified in a small code snippet to be added to the OpenIdAuthenticationOptions in Startup.Auth.cs.

Within the Notifications = new OpenIdConnectAuthenticationNotifications section, let’s add the following code:
RedirectToIdentityProvider = async n => {
n.ProtocolMessage.RedirectUri = "https://" + n.OwinContext.Request.Uri.Host + "/";
       n.ProtocolMessage.PostLogoutRedirectUri = "https://" + n.OwinContext.Request.Uri.Host + "/";
},
},


What this code does, it is simply to force the RedirectUri to whatever URL the request was coming from originally, no matter what has been defined in the AppSettings (either in the web.config file, or in some Application Setting in one of the many Deployment Slots that your app might have… and good luck here).


So now the flow in this scenario becomes: 
  1. User requests the Azure URL (https://myappservice.azurewebsites.net)
  2. User is prompted for a SSL Certificate
  3. User provides any (wrong) SSL Certificate
  4. User is redirected to the AAD Login page (https://login.microsoftonline.com/.../oauth2/authorize)
  5. User inserts valid credentials
  6. User is redirected back to your app on the specific requested URL (https://myappservice.azurewebsites.net)
  7. The Certificate validation code kicks in and validates the wrong SSL Certificate provided by the User, and returns a 403 – Forbidden response
  8. User receives a 403 – Forbidden response (correctly)


Phew, that was easy, wasn’t it?
(:

Now there’s only one last bit remaining: remember we said that all traffic must go through the F5 load balancer?

So what happens now if the User can somehow provide a valid SSL Certificate, and also figures out the Azure URL and calls it directly?

Surprise surprise… He will log onto the web app bypassing altogether the F5!

So for this you will need to implement IP Whitelisting, and so allow ONLY the F5 incoming traffic to the App Service.

Here is a sort of cheat-sheet of the parts needed in this post:

Wednesday, July 26, 2017

NoSQL in Azure: Cosmos DB

NoSQL technologies have been around for a while now; in the past I wrote about both MongoDB and Graph Databases.

Recently Microsoft introduced the Cosmos DB offer within its Azure Cloud, where Cosmos DB is not a Database, but instead a set of Common Data Services for NoSQL DBs in the Cloud (such as scalability, distribution, partitioning, etc), described as a “globally distributed database service designed to enable you to elastically and independently scale throughput and storage across any number of geographical regions with a comprehensive SLA. You can develop document, key/value, or graph databases with Cosmos DB using a series of popular APIs and programming models”.

Azure Cosmos DB currently supports the following NoSQL DBs:
  • DocumentDB
  • MongoDB
  • Table API
  • Graph API

The price unit in Cosmos DB is called Request Unit, which is defined as: 

A Request Unit (RU) is the measure of throughput in Azure Cosmos DB. 1 RU corresponds to the throughput of the GET of a 1KB item”.

There is a RU Calculator to estimate the cost of your Cosmos DB.

More information on Cosmos DB can be found here.

A nice detail is that all experimenting with Cosmos DB can be done locally with the Azure Cosmos DB Emulator, without having to spend any money on Azure (at least during the initial development).

MongoDB

MongoDB is probably the most mature NoSQL DB in the market. It has been used for years now, and offers flexibility of data storing, great performances (especially on Big Data).

MongoDB is a Document database which stores data in flexible, JSON-like (BSON) documents, meaning fields can vary from document and data structure can be changed over time.

MongoDB is now part of the Cosmos DB offer, which makes it easier to integrate it in a Microsoft environment, especially on Azure.

An example of a MongoDB document (a Row in a RDBMS) is here:
{
  "id": "WakefieldFamily",
  "parents": [
      { "familyName": "Wakefield", "givenName": "Robin" },
      { "familyName": "Miller", "givenName": "Ben" }
  ],
  "children": [
      {
        "familyName": "Merriam",
        "givenName": "Jesse",
        "gender": "female", "grade": 1,
        "pets": [
            { "givenName": "Goofy" },
            { "givenName": "Shadow" }
        ]
      },
      {
        "familyName": "Miller",
         "givenName": "Lisa",
         "gender": "female",
         "grade": 8 }
  ],
  "address": { "state": "NY", "county": "Manhattan", "city": "NY" },
  "creationDate": 1431620462,
  "isRegistered": false
}

The main advantage of using MongoDB within Cosmos DB is the better integration in terms of development and deployment; in fact, using MongoDB within Cosmos DB removes the need for a VM to host the MongoDB service, and Microsoft tools such as the Cosmos DB Emulator will make it easier to build MongoDB solutions that run both locally and within Azure in a matter of clicks.

A basic tutorial on MongoDB in C# is here.

DocumentDB

DocumentDB is the Microsoft Azure offer in alternative to MongoDB; a lot has been written about the comparison with MongoDB, and so it’s out of scope here.

The main advantage of using DocumentDB instead of MongoDB is the better integration with Microsoft tools and required development libraries, even though now that MongoDB is supported by Cosmos DB this gap gets shorter and shorter.

For the RDBMS fans out there, it’s worth mentioning that DocumentDB introduced a feature called Document DB API SQL, which allows standard SQL syntax to be used to query the DocumentDB NoSQL database (btw, see the contradiction?).

Documents (Rows of data) in DocumentDB are like those in MongoDB, except the Microsoft product works with plain JSON instead of BSON.

A basic tutorial on DocumentDB in C# is here.

Graph API

A graph is a structure that's composed of vertices and edges. Both vertices and edges can have an arbitrary number of properties. Vertices denote discrete objects such as a person, a place, or an event. Edges denote relationships between vertices. For example, a person might know another person, be involved in an event, and recently been at a location. Properties express information about the vertices and edges.

Graph Databases have been around for some time now (especially since Social Media companies such as Facebook and Twitter became popular). A notable example of a Graph Database is Neo4J.

Azure Cosmos DB offers a Graph API as the Azure Graph DB offer; the languages used to query Azure Cosmos DB are the ApacheTinkerPop graph traversal language, Gremlin, or other TinkerPop-compatible graph systems like ApacheSpark GraphX.

Again, the tooling integration for the Microsoft product is much better than its graph DB competitors; when it comes to the graphical representation of the graph data, something nicely supported by Neo4J out of the box, Microsoft offers an open source client application called Graph Explorer, which allow easy querying and displaying of the data.

An example of a graphical representation of a Graph dataset.

A Gremlin query to create a Vertex as:
g.addV('person');

A Vertex can have properties such as:
g.addV('person').property('id', 'thomas').property('firstName', 'Thomas').property('age', 44);

You can add an Edge such as “knows”, for each friend of Thomas:
g.V('thomas').addE('knows').to(g.V('ben'));

You can get all Vertex and Edges by running this query:
g.V(); g.E();

Then you can run a traversal query to show all the Friends of Thomas:
g.V('thomas').outE('knows').inV().hasLabel('person');

You can go as far as retrieving in a simple query all the Friends of Friends of Thomas:
g.V('thomas').outE('knows').inV().hasLabel('person').outE('knows').inV().hasLabel('person');

CATCH: Edges are one way directional, for example, “PersonA knows PersonB”, does not mean that “PersonB knows PersonA”, unless you add a second Edge to represent this.

For the usual RDBMS fans, you can read this introduction, and keep in mind that there is a nice document on how to “translate” SQL queries into Gremlin queries.

And here is the full Gremlin syntax documentation.

Table API


Azure Cosmos DB provides the Table API for applications that need a key-value store with flexible schema, predictable performance, global distribution, and high throughput. The Table API provides the same functionality as Azure Table storage, but leverages the benefits of the Azure Cosmos DB engine.

You can continue to use Azure Table storage for tables with high storage and lower throughput requirements. Azure Cosmos DB will introduce support for storage-optimized tables in a future update, and existing and new Azure Table storage accounts will be upgraded to Azure Cosmos DB.

More information about Table API can be found here.

Tuesday, July 11, 2017

Azure Apps Provisioning to External Users

So, you’re finally deploying your apps to Azure like there’s no tomorrow, through a solid CI and CD process, and everyone is happy about it.

Then you realize you still have one challenge: you need to provide those apps to your customers in a smooth but secure way, just like you’ve been doing for years with Active Directory Federation, where the customer logs onto his own AD, and from there he can access your apps.

How to achieve that in Azure?

Turns out that (after solving a few puzzles – we know MS documentation, don’t we) it is quite simple!

First you need to invite your customer to join your Azure Active Directory; this is done in the New Portal by opening the Azure Active Directory “menu blade”.


Then click on the menu item Users and groups.


Then click on the menu item All users.


Here you can invite an external user to join your AAD as a Guest; this will give your customer enough permission to use your Azure deployed apps (that you assign them permissions to), without being able to access your other Azure resources.

NOTE: It is also possible from the Classic Portal (only) to add an external user by creating a full user within your Active Directory, but that’s out of scope here.

Now click on the New guest user link.


Here you will simply write your customer email address, and optionally a personal message to be included with the invitation.

Once this is done, and email message will be sent to your customer inbox, looking like this.


Once your customer will click on this link he’ll get to the URL http://myapps.microsoft.com, where he will see an empty page!

:)


Yes, first you need to assign permissions to some app that you want your customer to be able to use.

This can be done in the Azure Portal, within the Azure Active Directory section, under Enterprise Applications. Select the Application you need to assign, then click on the Users and groups menu item.


From here you can click on the Add user button.


There you will be able to select the user(s) you want to assign to the App, and if any AppRole has been defined in the App Manifest, assign those as well.

Now your customer can access the same page again, but now he will see a list of allowed Apps.


And that’s it!


eCommerce Marketplace Integration: Scale Faster with ChannelEngine, Tradebyte, Channable & ChannelAdvisor-Rithum

Estimated Reading Time:   4 minutes Key Takeaways An owned eCommerce website is important, but it usually requires heavy investment in traf...